
Guide · Recording, synchronization & automation
How to Synchronize Art-Net Lighting with Audio on Raspberry Pi — and Run It Standalone
Record the lighting stream and optional audio on one prepared timeline, correct the fixed latency in the installed signal path, then run the complete show locally without leaving the console connected.
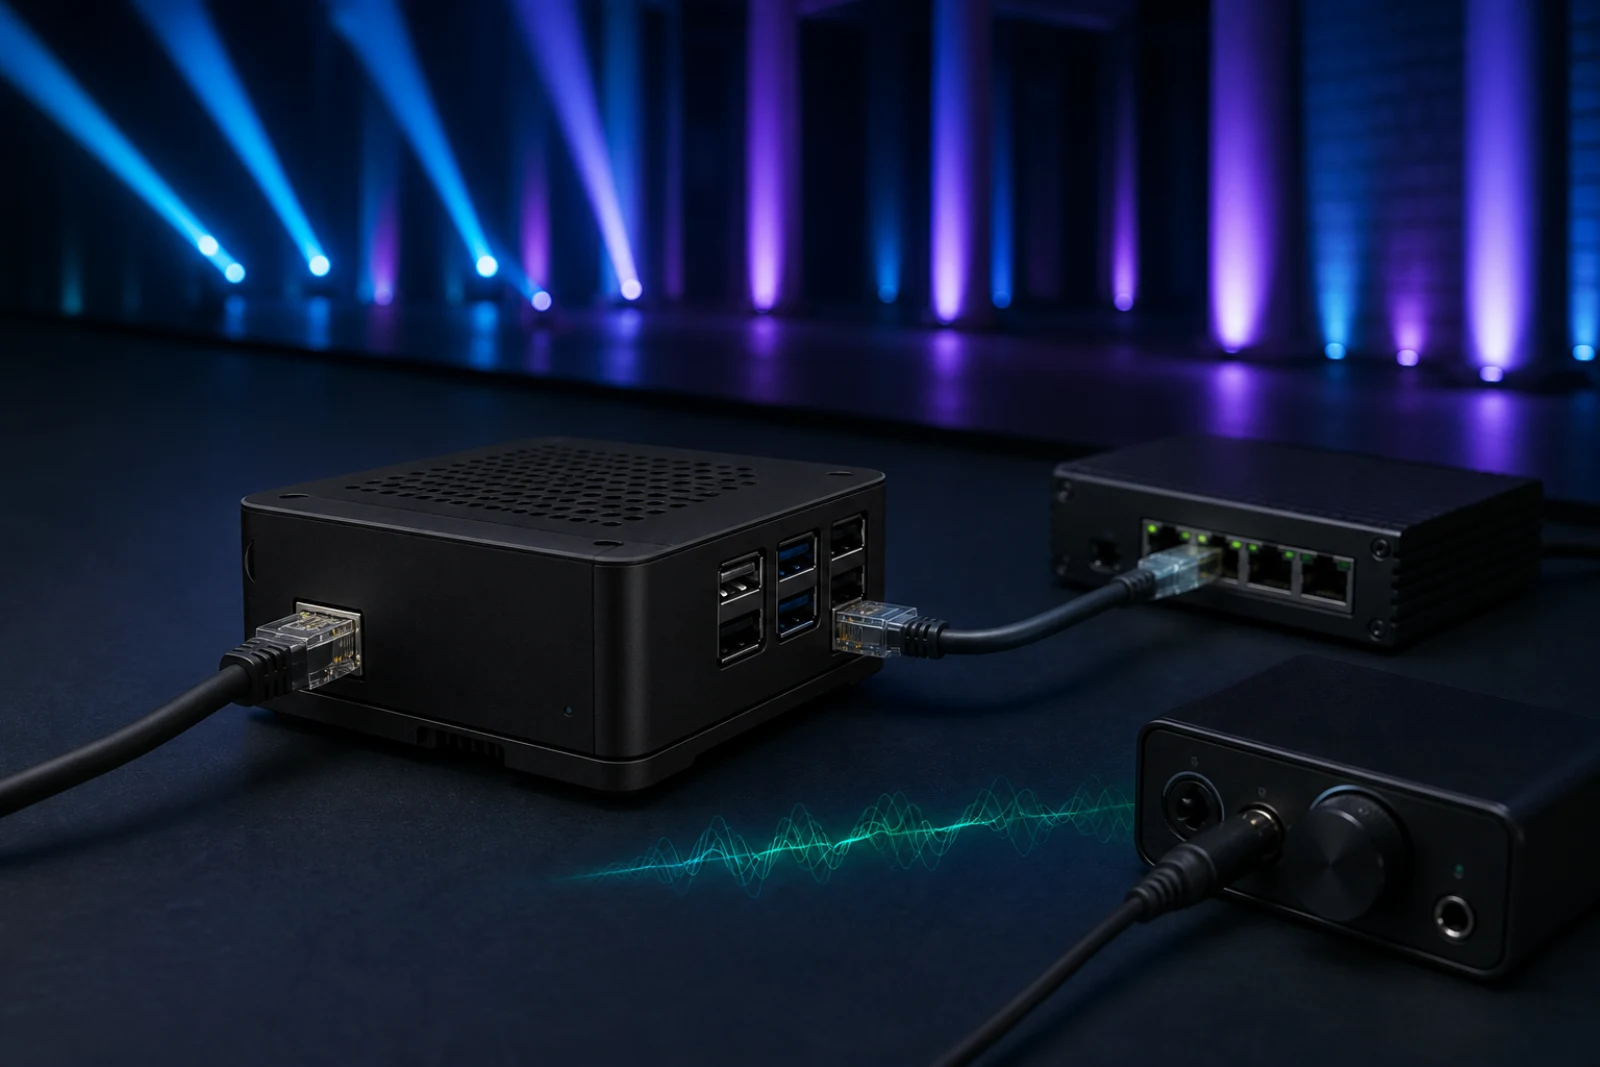
Build one repeatable show, not a stack of devices
A lighting show can look right while the console, audio computer and operator are present. The harder problem is leaving that show in a museum, façade, showroom, attraction or seasonal installation and expecting it to start correctly every day.
Small installations often accumulate separate devices for Art-Net playback, audio, a visitor button and daily startup. CUE/IO takes a simpler route: use the programming tools you already know, capture their Art-Net output with optional audio, verify the recording, calibrate the installed latency once and leave the Raspberry Pi on site as the standalone Art-Net player.
What “synchronized” really means
There are two separate timing problems. First, lighting data and audio must be prepared on one deliberate timeline and replayed as one CUE/IO show. Capturing both in the same recording session is the most direct method, but a show recorded without sound can also receive a finished audio track later in Files, with a measured start delay and an explicit length mode. Second, the physical outputs must be aligned: an audio interface, DSP, amplifier, network switch, Art-Net node or fixture can add a fixed delay after the prepared timeline.
The recording keeps Art-Net and audio together. The DMX playback offset corrects the installed output path. A show can be internally aligned while the loudspeaker and fixture still react at slightly different moments; commissioning must address both.
Program on the console → record Art-Net + audio → verify the real outputs → calibrate the fixed delay → choose the standalone trigger.
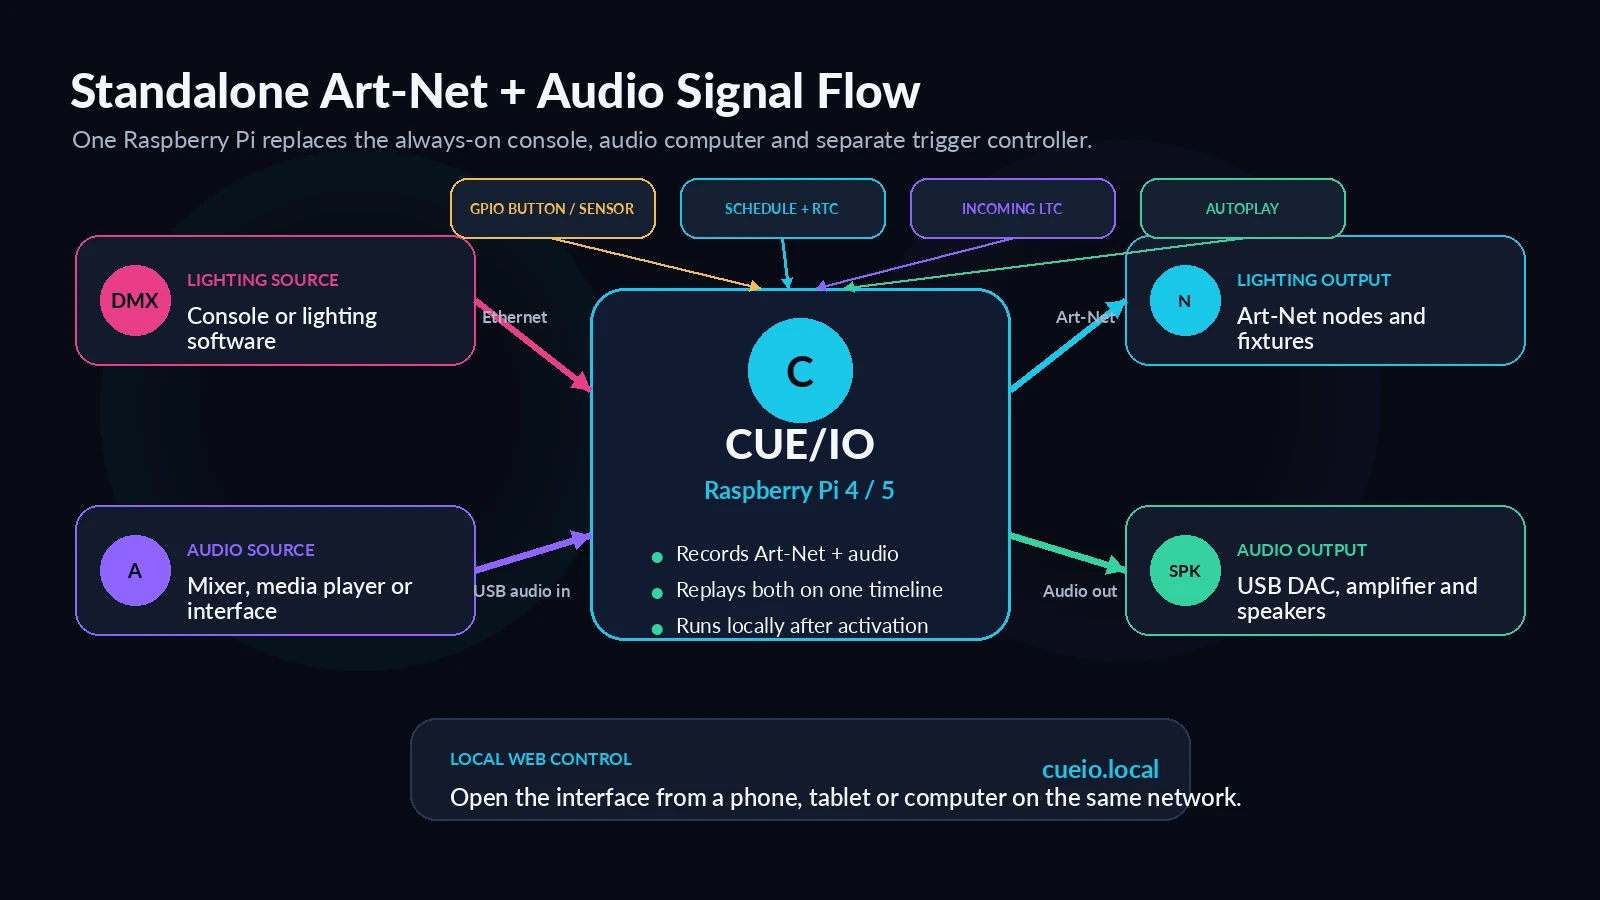
Prepare and verify both signal paths
What you need
- A Raspberry Pi 4 or Raspberry Pi 5 with a quality power supply and storage sized for the expected recordings and backups.
- Wired Ethernet connected to the Art-Net network.
- A console or lighting application that transmits Art-Net while the show is recorded.
- Art-Net nodes or network-capable fixtures for playback.
- A tested Linux-compatible USB audio interface when audio recording is required, plus the installed audio output path.
- Optional GPIO buttons or sensors, an incoming LTC source and a DS3231 real-time clock.
CUE/IO is a network recorder; it does not provide a physical three-pin or five-pin DMX input. Convert a DMX-only source to Art-Net before recording.
Step 1: configure audio and the Art-Net interface
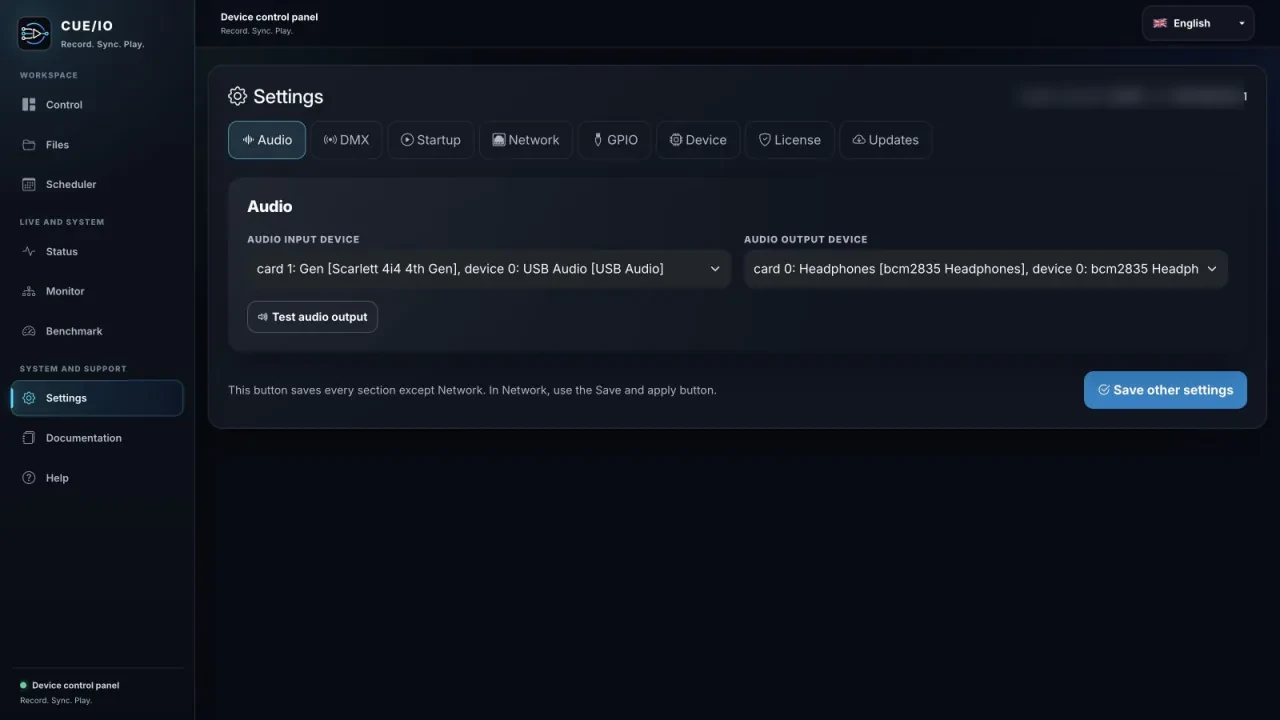
Open CUE/IO from a phone, tablet or computer on the same local network. In Settings → Audio, choose the input used for recording and the output used during playback, then run the output test. A USB device appearing in a list does not prove that its cable, driver and signal path are ready, so test it before the real take.
In Settings → Network / DMX, select the physical interface connected to the lighting network, confirm the address and subnet, and configure the required broadcast or unicast output. Wired Ethernet for Art-Net and a separate management interface can keep show traffic predictable while retaining convenient local control.
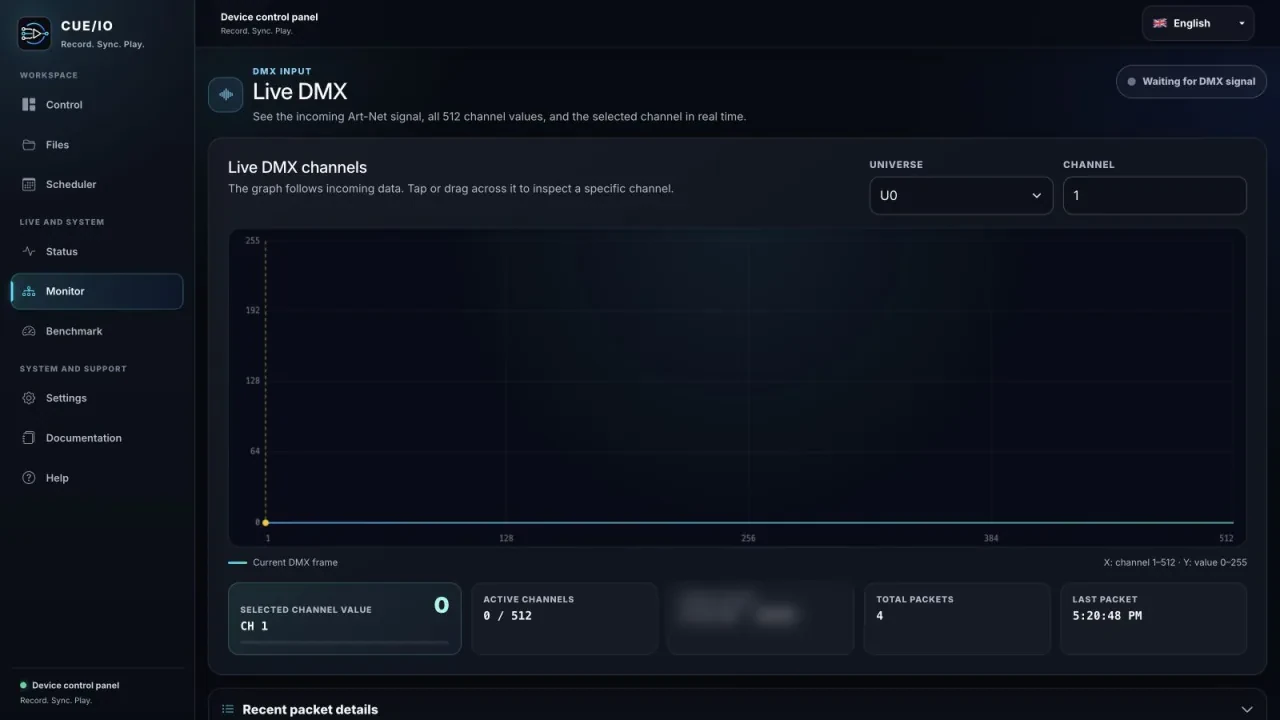
Step 2: verify Art-Net before recording
Open Monitor → Live DMX, select the expected universe and move a known fader or run a short cue. The monitor shows the selected channel, all 512 values, active channels, packet count, signal source and recent packet details. A changing graph confirms that data is reaching the Raspberry Pi.
Do not use the recording itself as the first signal test. If the monitor receives no universe, resolve the interface, address, subnet, universe or console-output configuration before pressing Record.
Record once, then verify the real installation
Step 3: record Art-Net and audio together
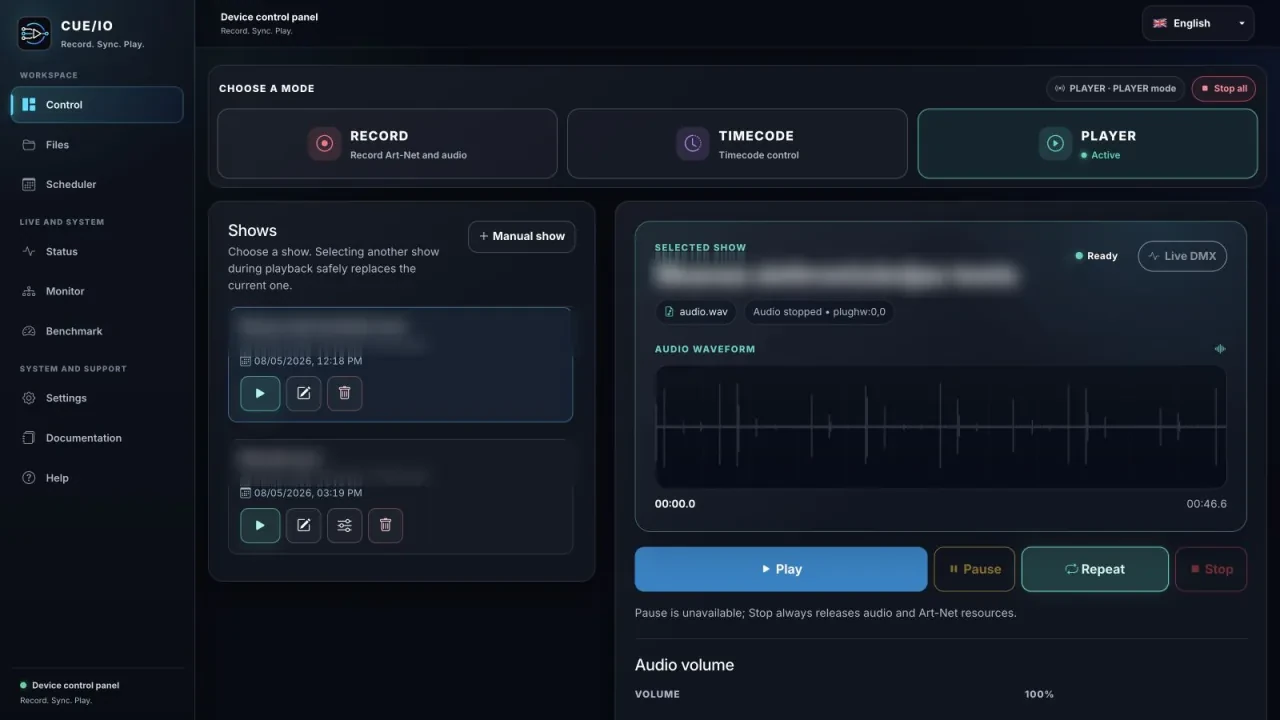
Open Control, select RECORD and give the show a name that identifies the project, scene and version. Choose whether audio should be included and confirm the selected interfaces.
The Raspberry Pi Art-Net recorder offers three practical start methods:
- Start immediately.The session begins when Start recording is pressed; this is the simplest rehearsal workflow.
- Wait for the first DMX packet.CUE/IO prepares the session, then begins the lighting capture when the first Art-Net packet arrives.
- Start and stop from an Art-Net channel.A chosen universe and control channel can arm and stop the recorder from the console using separate start and stop thresholds.
During the take, watch received universes, packet rate, audio level, duration, file size, remaining disk space and visible readiness messages. If audio is enabled but its input cannot be opened, fix the device or deliberately disable audio. A deliberate Art-Net-only recording can receive a prepared track later through Files → Manage audio; use a known cue to set Start delay, then choose Match show length or Keep full audio and verify the complete playback. After the final cue, stop and wait until processing is complete before changing mode or removing power.
Step 4: verify playback through the real outputs
Select PLAYER, choose the saved show and confirm its duration, audio status and universe count. Set volume, mute, loop and the required Art-Net route, then replay it through the nodes, fixtures, audio interface, DSP, amplifier and speakers that will remain on site.
Check the opening cue, several transitions, the end state and any loop point. This is where an Art-Net recorder with audio becomes a commissioned system rather than merely a successful file capture.
Correct the fixed audio-to-lighting latency
Fixed delay may come from the USB audio interface and ALSA buffer, a DAC or DSP, the amplifier and loudspeaker path, a switch or Art-Net node, fixture electronics, movement or dimmer response.
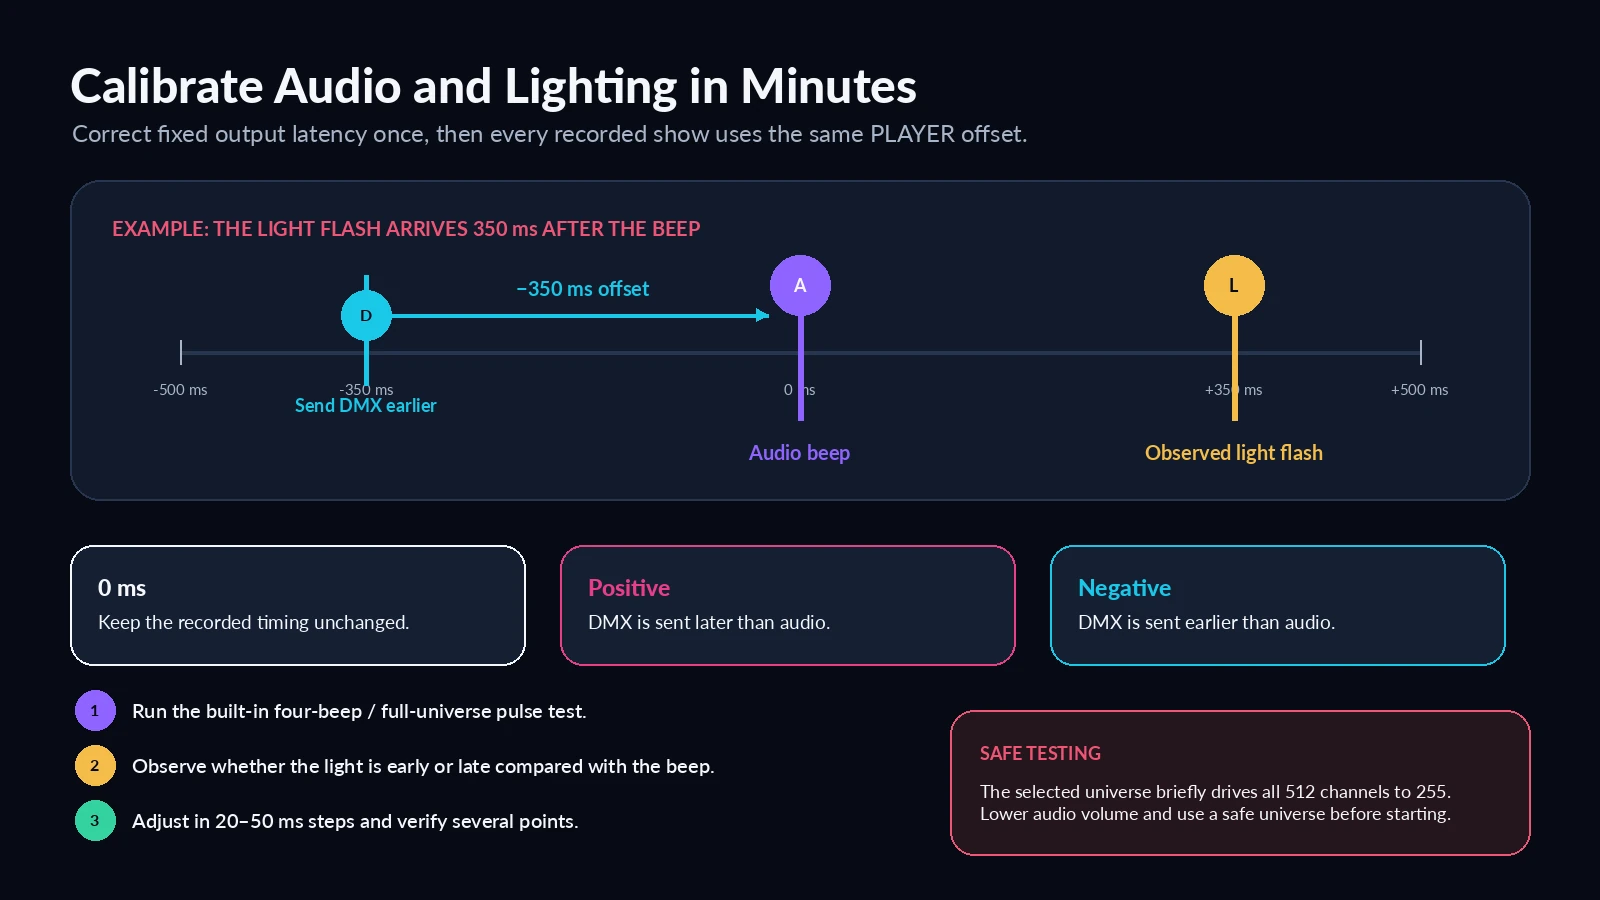
CUE/IO applies a DMX playback offset whenever PLAYER starts:
- 0 ms preserves the recorded timing.
- A positive value sends DMX later than audio.
- A negative value sends DMX earlier than audio.
If the visible flash occurs about 350 ms after the audible beep, begin near −350 ms. The lighting data is sent earlier so the installed fixture response can meet the sound.
The built-in calibration test produces four precise beeps and full-universe DMX pulses. Choose a safe test universe and lower the audio level before starting: the selected universe briefly sends value 255 and then 0 to all 512 channels, so connected fixtures may react. Adjust the offset in 20–50 ms steps and verify several pulses after every change.
Fixed delay or synchronization drift?
A consistent difference from start to finish is a fixed-latency problem and is what the playback offset corrects. A difference that changes during the show points elsewhere: unstable audio hardware, dropped packets, sequence errors, a changing network path, a damaged recording or unsuitable system load. Check Status, inspect the physical network and run the benchmark instead of continually increasing the offset.
Recalibrate after changing the audio interface, DSP, speaker path, Art-Net node, switch, fixture type or relevant buffering.
Inspect PLAYER, Monitor, Scheduler, Status and Settings in the interactive demo.
Choose how the standalone show starts
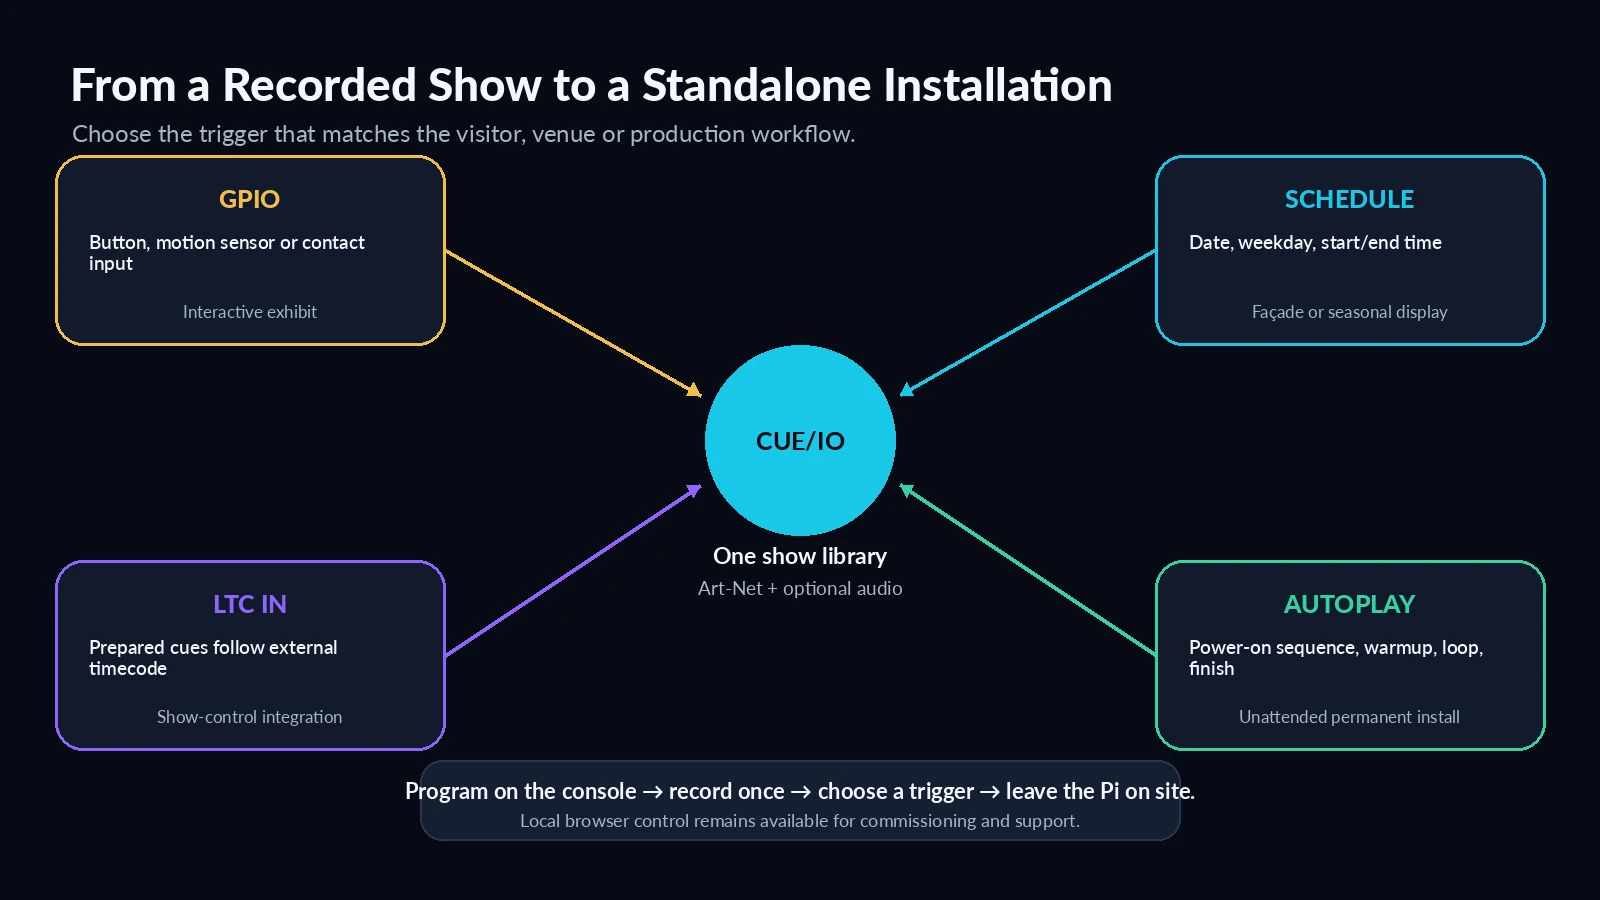
After recording, verification and calibration, the console is no longer required for normal playback. The same prepared show can be started in several ways.
GPIO: buttons, switches and sensors
Up to four Raspberry Pi GPIO inputs can be mapped to supported show actions. A GPIO-triggered lighting show can begin from a visitor button, motion sensor, door contact or suitable external control circuit. Configure the BCM pin, active HIGH or LOW state, show, action, debounce and playback protection for each input.
Power down before changing wiring, use a correctly designed input circuit and never apply 5 V directly to a Raspberry Pi GPIO pin.
Scheduler and optional RTC
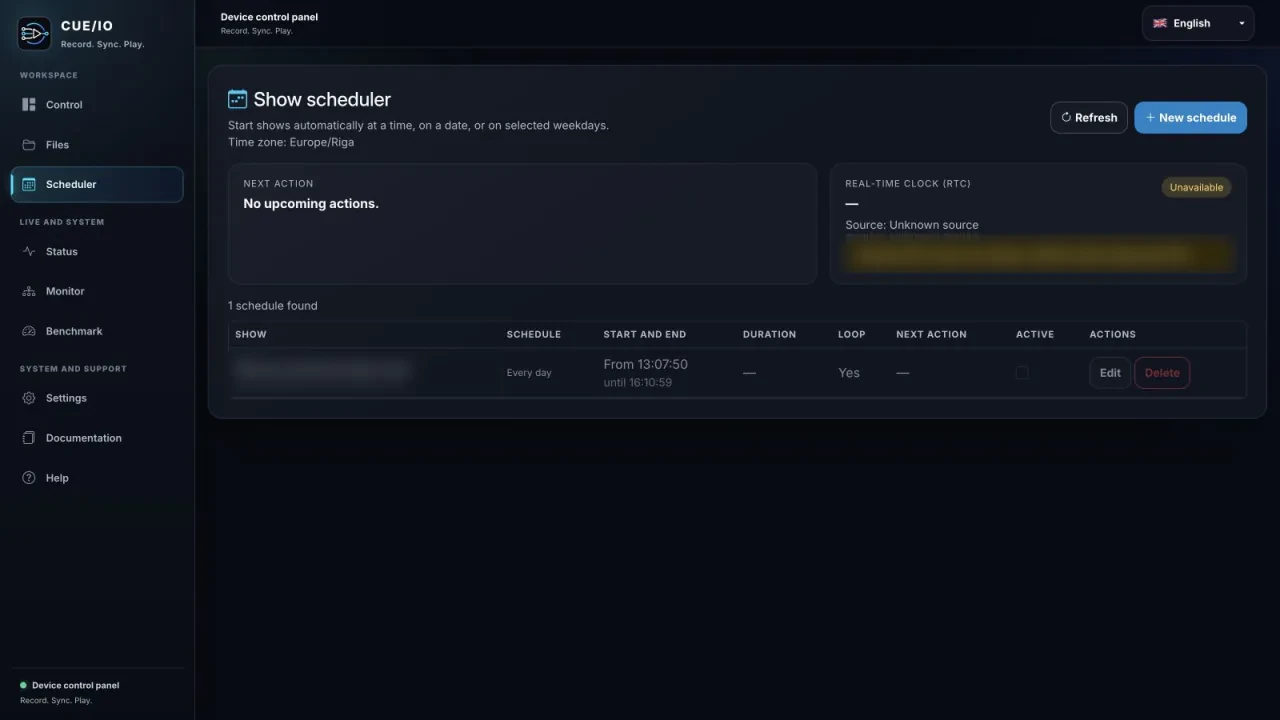
Scheduler can launch a show on a date, every day, on selected weekdays, on workdays or on weekends. Define a start time, end time or duration and optionally loop for the scheduled interval. A DS3231 real-time clock can retain accurate time without internet after a power interruption; confirm the time zone, RTC status and next action before handover.
Incoming LTC
CUE/IO can receive LTC, display the detected frame rate and start prepared shows at configured timecode cues. It receives LTC; it does not generate it. If the system comes online after a cue has begun, it waits for the next configured cue instead of jumping into the middle of a show.
Autoplay and Show Sequence
For power-on recovery, prepare a sequence such as Power On → optional Warmup → Wait → Main Show → optional Loop → safe Finish. The unit can then resume the intended workflow without an operator opening the browser.
Commission the player for unattended operation
A reliable audio-synchronized lighting controller needs more than Play. It also needs backups, diagnostics, resource safeguards and a repeatable handover test.
Files, audio management, trimming and simple show creation
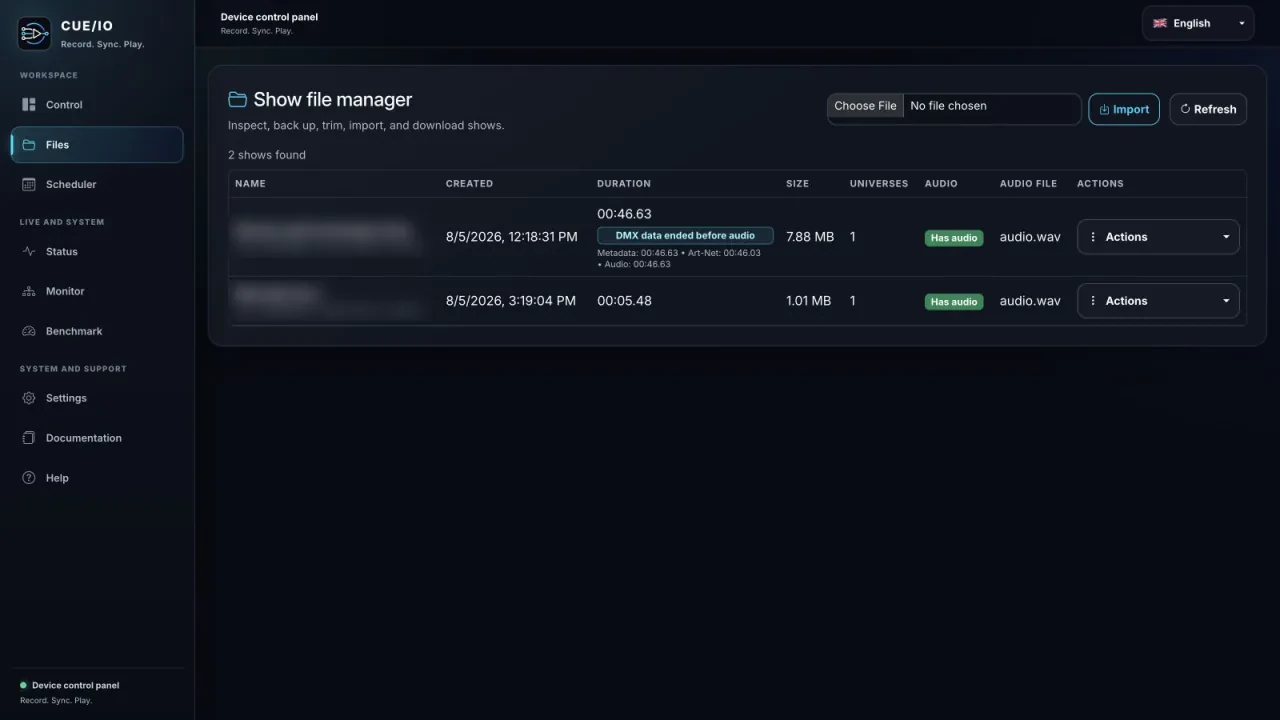
Shows can be renamed, duplicated, imported, exported and downloaded. Manage audio can add sound to a recording made without it, replace an existing track or remove it. Start delay inserts silence; Match show length crops or pads the end, while Keep full audio retains the complete track without changing speed or pitch. Every audio change creates a backup and leaves Art-Net data unchanged. Synchronized trimming previews a selected segment through the physical Art-Net and audio outputs, backs up the show and trims both data types to the same boundaries. For simple reveals, house-light states or announcements, the manual builder can combine an audio file with fixed DMX scenes without a console recording.
Status, benchmark and safeguards
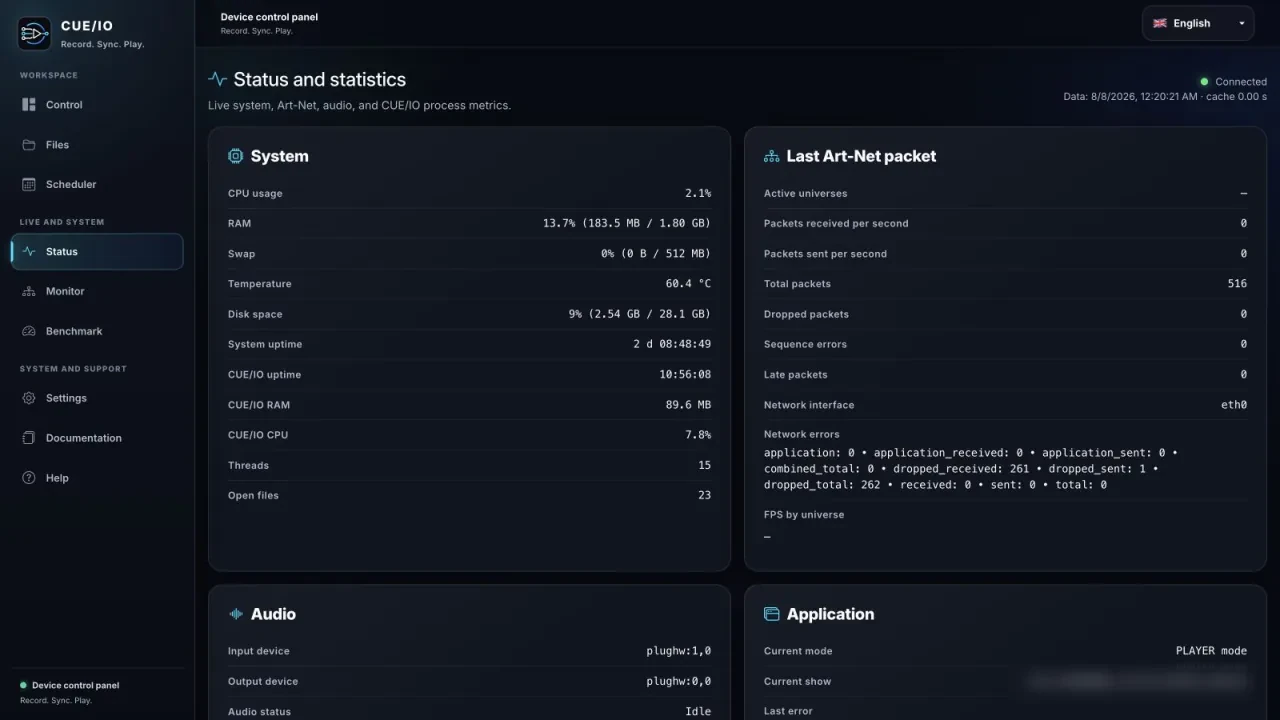
Status exposes CPU, RAM, temperature, disk use, uptime, active universes, packet rates, dropped packets, sequence errors, audio under/overruns, synchronization offset, active mode and the last error. Record the exact time, mode, show and error when asking for support.
The safe universe count depends on the actual Raspberry Pi, storage, audio device, frame rate, temperature and network. Run the built-in benchmark on the deployed configuration, then test the full physical Ethernet path with the real console, switch, cables, nodes and fixtures. An internal benchmark cannot certify external equipment.
Automatic startup, process recovery, free-space limits and a critical recording stop help protect unattended operation. Local browser access keeps routine commissioning and recovery independent of an attached monitor and keyboard.
Where this workflow fits
- Museums and exhibitions: start narration and lighting from a visitor button or sensor, then return to an idle show.
- Architectural façades and showrooms: schedule the installed sequence and recover automatically after power returns.
- Seasonal displays: loop during opening hours and retain a verified backup.
- Attractions and interactive props: use debounce and “ignore while playing” rules to prevent repeated restarts.
- Venue or touring backup: keep a tested local copy of a critical Art-Net and audio sequence.
Commissioning checklist
- Confirm input.Verify incoming Art-Net in Monitor and make one short recording with audio.
- Test the complete output path.Replay through the real fixtures, node, audio processor, amplifier and speakers.
- Calibrate and inspect the whole show.Correct fixed latency, then check the beginning, middle, end and loop.
- Validate capacity and infrastructure.Run the benchmark and separately test the external switch, cables, nodes and fixtures.
- Prove the trigger and recovery.Test GPIO, schedule, LTC or autoplay, then perform a planned power-cycle test.
- Finish the handover.Confirm time, time zone, RTC and next action; export a backup and document safe shutdown.
Program with the tools you already know. Record once. Calibrate once. Run the show without leaving the console connected.
Frequently asked questions
Does CUE/IO need the lighting console during playback?
No. Use the console or lighting software to program and record the Art-Net show. CUE/IO handles standalone playback afterward.
Does it work without internet?
Internet is required for initial licence activation. Recording, local browser control and playback can then run on the local network. An optional RTC helps schedules retain correct time without internet.
Can it record physical DMX directly?
No. CUE/IO records Art-Net network data. A physical DMX-only source requires a DMX-to-Art-Net conversion path.
Does CUE/IO generate LTC?
No. It receives incoming LTC and uses configured cues to trigger prepared shows.
How many Art-Net universes can a Raspberry Pi play?
There is no honest single number for every installation. Run the benchmark on the exact Raspberry Pi, storage, audio and frame-rate configuration, then validate the real physical network.
What happens when audio is not needed?
Audio is optional. An Art-Net-only show can be recorded and played without an audio interface.
Can a visitor button start the show?
Yes. Up to four Raspberry Pi GPIO inputs can be mapped to supported show actions, with debounce and playback-protection settings.
Is this a standalone DMX show player?
It is a standalone player for Art-Net, which carries DMX values over Ethernet. CUE/IO does not provide a physical DMX output connector; use Art-Net nodes or network-capable fixtures.